How to Extend Windows Disk after Upgrading VPS
After upgrading your VPS, you may find that you need to extend your Windows disk to accommodate additional data or applications.
There are several ways to extend a Windows disk, including using PowerShell or Disk Manager.
Option 1: Extend a volume with PowerShell
To extend a volume by using PowerShell, follow these steps.
Select and hold (or right-click) Windows Start, and then select Windows PowerShell (Admin).
Enter the following command to resize the volume to the maximum size.
For the $drive_letter variable, specify the drive letter of the volume to extend.
# Variable specifies the disk drive to extend
$drive_letter = "C"

# Script gets the partition sizes, and resizes the volume
$size = (Get-PartitionSupportedSize -DriveLetter $drive_letter)
Resize-Partition -DriveLetter $drive_letter -Size $size.SizeMax
Option 2: Extend a volume with Disk Management
To extend a volume by using Disk Management, follow these steps.
Open Disk Management with administrator permissions.
If you can't open Disk Management as an administrator, follow these steps:
Select and hold (or right-click) the volume that you want to extend, and then select Extend Volume. The Extend Volume Wizard opens.
Note If the Extend Volume option isn't available, see the following section and check for volume extension issues to resolve.
In the Extend Volume Wizard, select Next.
In the wizard, under Select Disks, select how much disk drive space to use to extend the volume.
The default approach is to use all available empty space (Maximum available) on the disk drive.
If you plan to create other volumes in the available empty space, you can select a smaller amount of space to use to extend the volume.
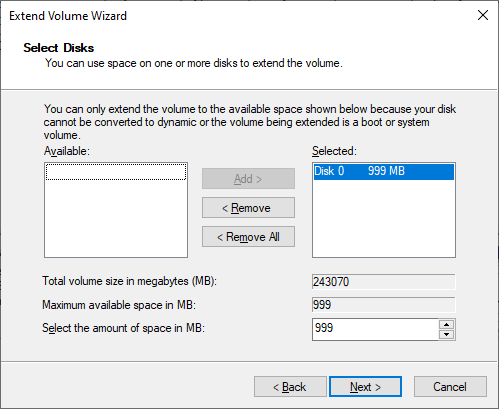
Select Next, and then select Finish to extend the volume.